
□ 목적 : 게시판 타이틀과 각 타이틀별 댓글까지 크롤링, 전처리하여 엑셀로 깔끔하게 자동 저장
□ 활용 라이브러리 및 사용이유
import requests  #크롤링 요청을 보낼 라이브러리
import openpyxl #엑셀 저장을 위해 사용
from bs4 import BeautifulSoup #크롤링 기능사용을 위해 호출한 라이브러리
from openpyxl.styles import Alignment, Font, colors, Border, Side  #엑셀 데이터 디자인 효과를 위해 호출
□ 세부내용
○ 특정 페이지 및 페이지의 게시글별 상세 페이지 데이터 크롤링
○ 임의 사이트(개인수강하는 곳에서 지원하는 웹)에서 추출하고자하는 데이터를 +1개씩 증가하며 코딩
○ 한개의 데이터 및 기능추가 시 함수를 정의하였음
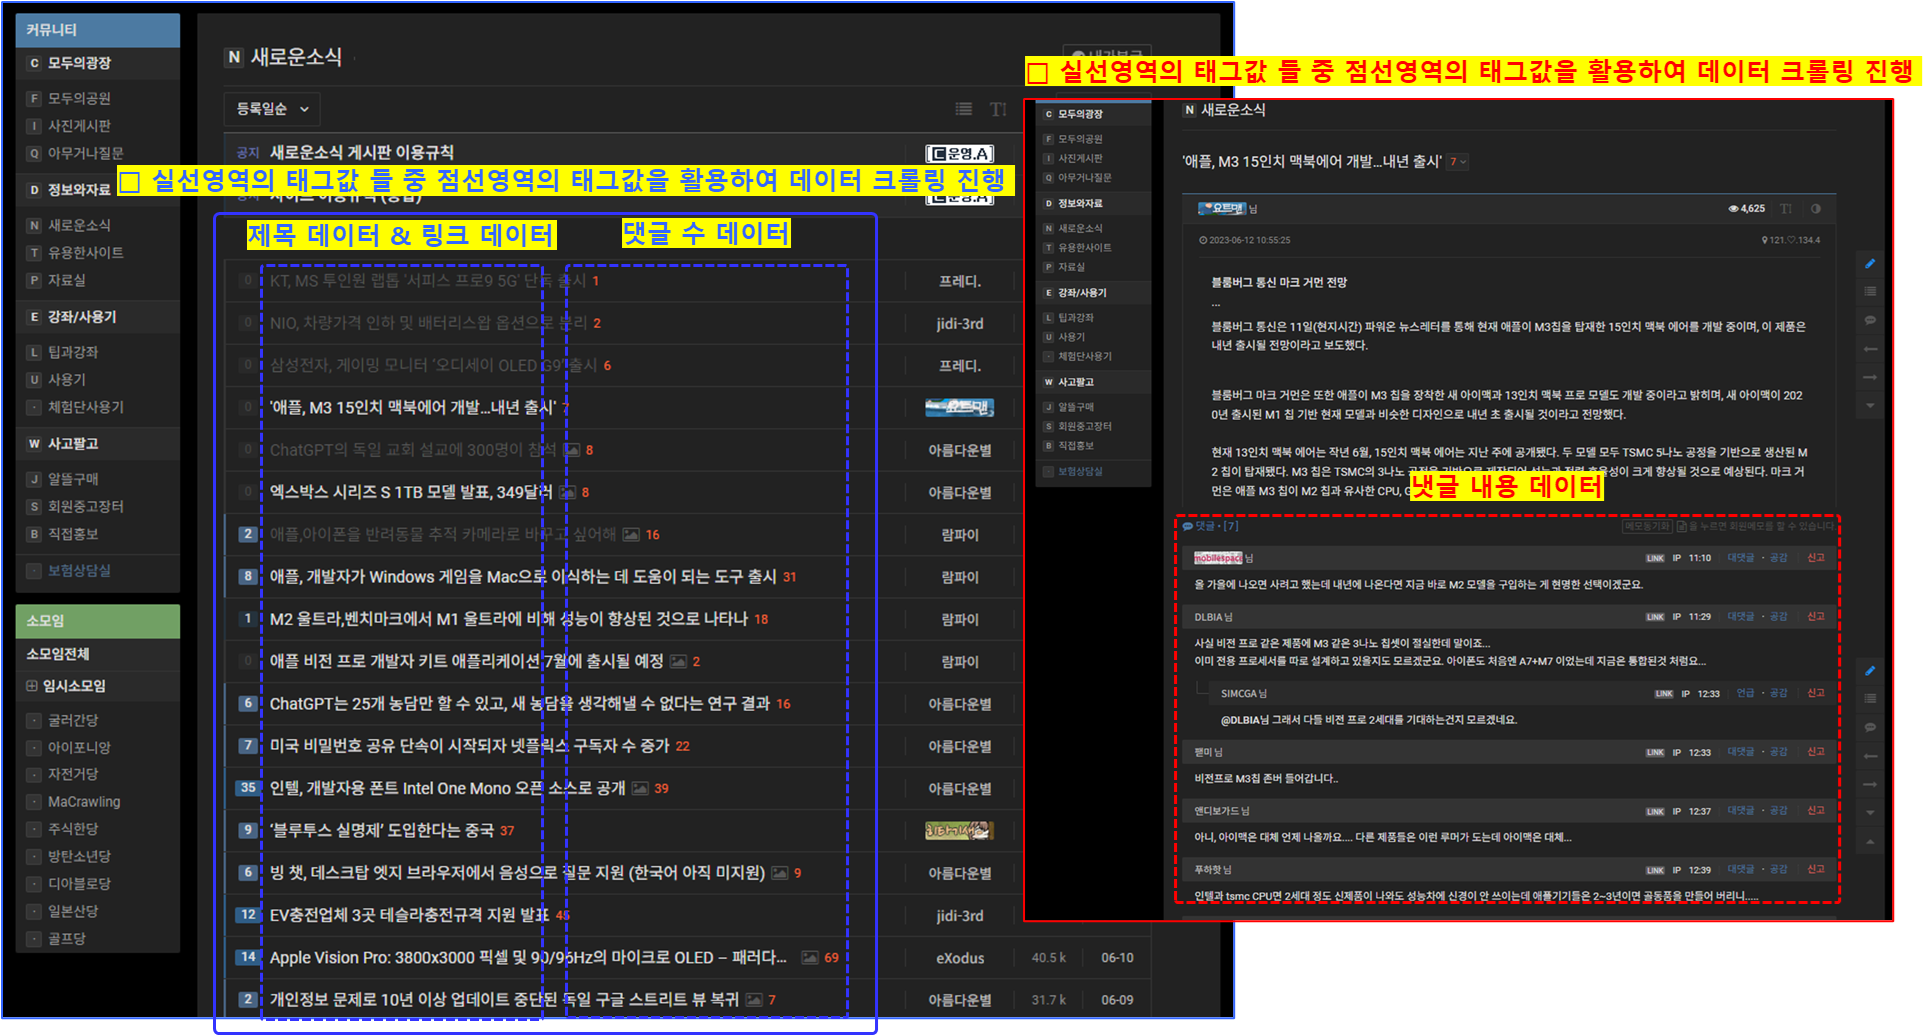
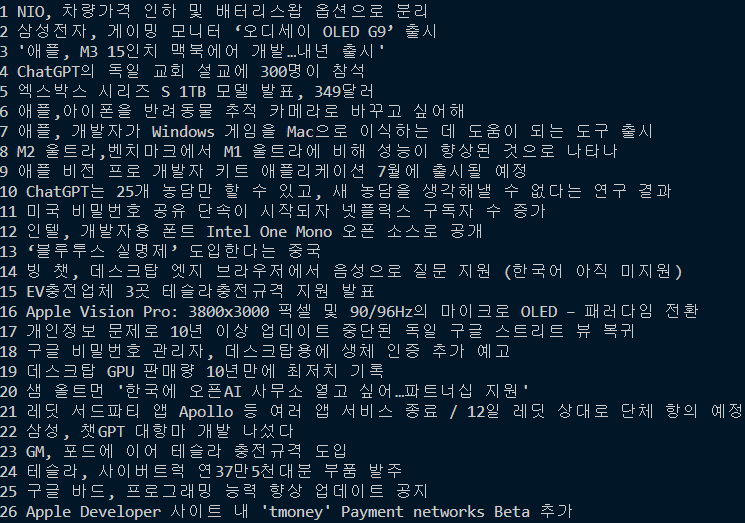
○ 크롤링 : 제목 데이터
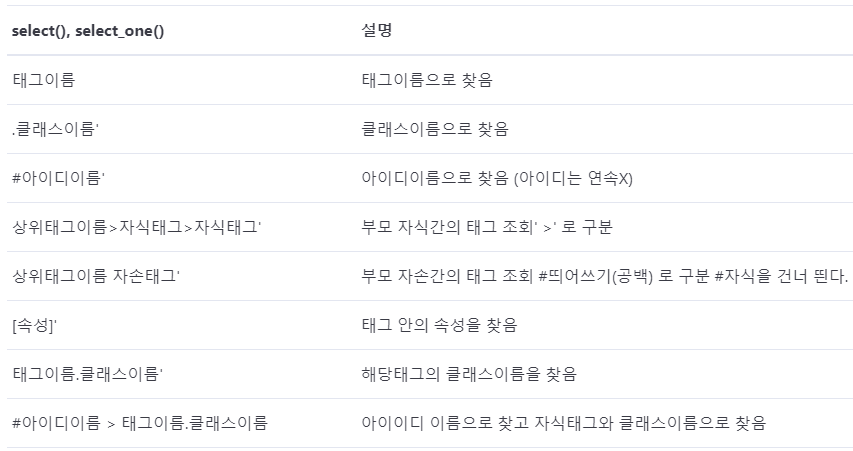
- 위 그림과 같이 푸른실선 영역의 태그값을 select으로 데이터 리스트화
* select()함수는 타겟 사이트에서 파싱하여 가져온 데이터를 리스트형식으로 저장해줌
- 아래 코드를 보면 div 태그의 클래스 네임이 list_item symph_row 인 영역을 대상으로 select하였고, 리스트화 된 데이터들 중 span 태그의 클래스 네임이 subject_fixed 인 데이터를 select_one하여 크롤링하였음
- .get_text() 후 텍스트로 추출 후 앞뒤 공백제거를 위해 .strip()을 사용하였음
- 게시글별 번호를 부여하기위해 for문 사용시 enumerate()함수를 지정하여 게시글에 따라 번호가 부여되도록 코딩
# 함수정의 : 인덱스번호 + 제목
def CATCH_INDEX_TITLE():
    #크롤링 대상 사이트에 요청세팅
    my_Req = requests.get('크롤링 URL')
    my_Soup = BeautifulSoup(my_Req.content, 'html.parser')
    all_Data_area = my_Soup.select('div.list_item.symph_row') #div 태그 중 클래스네임이 list_item 인것 / select 은 데이터를 리스트화 함

    # 구분번호, 타이틀
    for index, v in enumerate(all_Data_area):
        title = v.select_one('span.subject_fixed')
        if title != None:  #select_one 메서드는 지정된 선택자에 매칭되는 태그를 찾지 못할 경우 None을 반환하는데 이경우에 바로 .get_text()를 사용하면 오류 발생되므로 예외처리 진행
            edit_Title = title.get_text().strip()
            print(index, edit_Title)
○ 크롤링 : 제목 데이터 + 댓글 수
- '크롤링 : 제목 데이터' 에 이어서 작성
- 댓글 수 또한 제목 데이터 크롤링한 방식으로 코딩하였고 출력시 앞/뒤 공백제거를 위해 .strip()를 사용했음
- 댓글 수 연산을 나중에 처리할 가능성이 있다고 생각하여 int()로 미리 형변환 하였음
def CATCH_INDEX_TITLE_COMMENTCNT():
    #크롤링 대상 사이트에 요청세팅
    my_Req = requests.get('크롤링 url')
    my_Soup = BeautifulSoup(my_Req.content, 'html.parser')
    all_Data_area = my_Soup.select('div.list_item.symph_row') #div 태그 중 클래스네임이 list_item 인것 / select 은 데이터를 리스트화 함

    # 구분번호, 타이틀, 댓글 수
    for  index_numb, v in enumerate(all_Data_area):
        title = v.select_one('span.subject_fixed')
        comment = v.select_one('span.rSymph05')
        if title != None: #select_one 메서드는 지정된 선택자에 매칭되는 태그를 찾지 못할 경우 None을 반환하는데 이경우에 바로 .get_text()를 사용하면 오류 발생되므로 예외처리 진행
            edit_Title = title.get_text().strip()
            edit_Comment = int(comment.get_text().strip())
            print('○●○●○●○●○●○●○●○●○●○●○●○●○●○●○●○●○●○●○●○●○●○●○●○●○●○●○●○●○●○●○●○●○●○●○●○●○●○●○●○●○●○●')
            print(f'인덱스번호\t:\t{index_numb} 번\n게시글 제목\t:\t{edit_Title}\n글수\t:\t{edit_Comment} 개')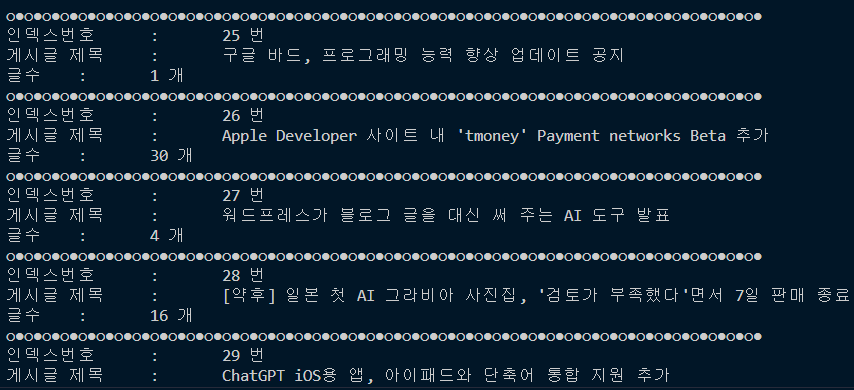
○ 크롤링 : 제목 데이터 + 댓글 수 + 링크
- '크롤링 : 제목 데이터 + 댓글 수' 에 이어서 작성
- 특정 게시글 태그값의 하위로 있는 링크 태그의 속성값을 추출하기위해 'link['href']'을 사용하였음
# 함수정의 : 구분번호 + 제목 + 댓글수 + 링크
def CATCH_INDEX_TITLE_COMMENTCNT_LINK():
    #크롤링 대상 사이트에 요청세팅
    my_Req = requests.get('크롤링 url')
    my_Soup = BeautifulSoup(my_Req.content, 'html.parser')
    all_Data_area = my_Soup.select('div.list_item.symph_row') #div 태그 중 클래스네임이 list_item 인것 / select는 리스트로 가져옴

    # 구분번호, 타이틀, 댓글수, 링크
    for index_numb, v in enumerate(all_Data_area):
        title = v.select_one('span.subject_fixed')
        comment = v.select_one('span.rSymph05')
        link = v.select_one('a.list_subject')
        if title != None:
            edit_Title = title.get_text().strip()
            edit_Comment = comment.get_text().strip()
            edit_Link = link['href']  #link href 속성값
            print('○●○●○●○●○●○●○●○●○●○●○●○●○●○●○●○●○●○●○●○●○●○●○●○●○●○●○●○●○●○●○●○●○●○●○●○●○●○●○●○●○●○●')
            print(f'인덱스번호\t:\t{index_numb} 번\n게시글 제목\t:\t{edit_Title}\n글수\t:\t{edit_Comment} 개\n게시글 링크\t:\t{edit_Link}')
○ 크롤링 : 제목 데이터 + 게시글별 댓글
- '크롤링 : 제목 데이터 + 댓글 수' 에 이어서 작성
- 게시글에 대한 세부페이지에 등록된 댓글을 추출
- Selenium을 활용했다면 게시글 클릭 후 페이지 이동을 자동화하여 크롤링했겠지만, 이번에는 requests만 사용했기에 '크롤링 url값 + link['href'] 값'을 조합하여 세부내용 페이지에 requests.get()으로 데이터 크롤링 및 댓글을 추출하였음
- 댓글 추출시 문단나뉨현상과 많은 뛰어쓰기 로 데이터 상태품질이 낮아 별도 가공함
- 가공을 위해 .replace('\n','') , .replace('\t','')를 사용했음
# 함수정의 : 게시글별 댓글 추출
def NOTICE_COMMENT():
    #크롤링 대상 사이트에 요청세팅
    url = '크롤링 url'
    my_Req = requests.get(url)
    my_Soup = BeautifulSoup(my_Req.content, 'html.parser')
    all_Data_area = my_Soup.select('div.list_item.symph_row') #div 태그 중 클래스네임이 list_item 인것 / select는 리스트로 가져옴
    # 구분번호, 타이틀, 댓글수, 링크
    for index_numb, v in enumerate(all_Data_area[:5]):
        title = v.select_one('span.subject_fixed')
        comment = v.select_one('span.rSymph05')
        link = v.select_one('a.list_subject')
        if title != None:
            edit_Title = title.get_text().strip()
            edit_Comment = comment.get_text().strip()
            edit_Link = link['href']  #link href 속성값
            edit_Link_second = edit_Link.replace('news/','') #edit_link에서 news/를 공부으로 대체하는 전처리
            edit_url = url.replace('.html','/') #기존 url 크롤링 페이지에서 .html을 / 로 대체하는 전처리

            #게시글 상세보기 → 해당 상세보기페이지
            detail_Content = edit_url + edit_Link_second
            #상세보기 페이지에 데이터 요청세팅
            my_Req_Second = requests.get(detail_Content)
            my_Soup_Second = BeautifulSoup(my_Req_Second.content,'html.parser')
            #select 문으로 div태그 중 comment_view 네임인 데이터들을 리스트로 선택
            comment_All = my_Soup_Second.select('div.comment_view')
            for i in comment_All:
                detial_Comment = i.get_text().strip().replace('\n',' ').replace('\t',' ')
            print(f'★★★★★★★★★★★★★★★★★★★★★★★★★★★★★★★★★★★★★\n{edit_Title} 댓글\n{detial_Comment}')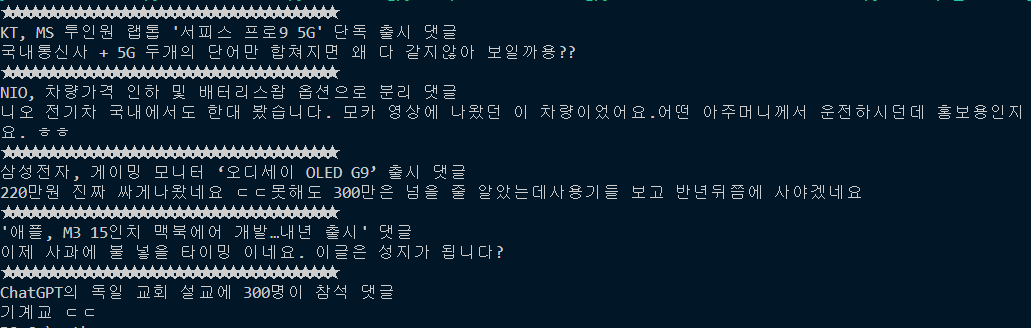
○ 크롤링 : 엑셀저장
- 상위 작성한 코드들 기반하여 openpyxl 라이브러리 활용하여 엑셀저장 및 커스터마이징하여 데이터 저장 실행
#### 엑셀 기본 코드
import requests, openpyxl
from bs4 import BeautifulSoup

excel_file = openpyxl.Workbook() #Workbook 생성
excel_sheet = excel_file.active #workbook 활성화
excel_sheet.title = '변경할 시트명' # active 시트 이름 변경
excel_file.save('경로/파일명.xlsx') # 파일저장 경로 지정
excel_sheet.append(['Value 1', 'Value 2', 'Value 3']) #엑셀 필드명 지정
excel_sheet.column_dimensions['A'].width = 20 #엑셀 필드 너비 지정

font = Font(bold=True, color='FF0000', underline='single') #폰트 지자인 적용 : bold, 칼러 지정, 밑줄 지정
cell.font = font

cell.hyperlink = 'url주소' #하이퍼링크 지정

alignment = Alignment(horizontal='center', vertical='top') #셀 수직, 수평 정렬위치 지정
cell.alignment = alignment

alignment = Alignment(wrap_text=True) #자동 줄바꿈 지정
cell.alignment = alignment

#셀 테두리 지정
from openpyxl.styles import Border, Side

thin_border = Border(left=Side(style='thin'), right=Side(style='thin'), top=Side(style='thin'), bottom=Side(style='thin')) #얇은 테두리
cell.border = thin_border


thick_border = Border(left=Side(style='thick'), right=Side(style='thick'), top=Side(style='thick'), bottom=Side(style='thick')) #두꺼운 테두리
cell.border = thick_border

#셀 배경색 지정
from openpyxl.styles import PatternFill

fill = PatternFill(start_color='FF0000', end_color='FF0000', fill_type='solid')
cell.fill = fill
- 기존 데이터 크롤링 코드에 위에서 언급한 엑셀 커스터마이징을 위한 코드를 적절히 사용
# 함수정의 : 엑셀저장
def SAVE_EXCEL():
    #엑셀설정
    excel_file = openpyxl.Workbook() #파일생성
    excel_sheet = excel_file.active #시트선택
    excel_sheet.title = '크롤링 데이터' #시트명 변경
    field_name = ['구분','제목','댓글'] #필드명 지정
    excel_sheet.append(field_name)
    #엑셀설정 : 디자인
    wrap_alignment = Alignment(wrap_text=True) #줄바꿈
    center_alignment = Alignment(horizontal='center', vertical='center') #수평/수직 정렬
    bold_font = Font(bold=True)
    hyperlink_font = Font(color = colors.BLUE, underline = 'single')
    header_font = Font(bold=True, size=20)  #엑셀 필드명 스타일
    # thin_border = Border(left=Side(style='thin'),
    #                  right=Side(style='thin'),
    #                  top=Side(style='thin'),
    #                  bottom=Side(style='thin'))
    # ↑ 테두리효과
    for cell in excel_sheet[1]:
        cell.font = header_font   #필드명에 디자인 효과 적용
        cell.alignment = center_alignment #필드명 정렬
    excel_sheet.column_dimensions['A'].width = 10
    excel_sheet.column_dimensions['B'].width = 60
    excel_sheet.column_dimensions['C'].width = 80

    #크롤링 대상 사이트에 요청세팅
    url = '크롤링 url'
    my_Req = requests.get(url)
    my_Soup = BeautifulSoup(my_Req.content, 'html.parser')
    all_Data_area = my_Soup.select('div.list_item.symph_row') #div 태그 중 클래스네임이 list_item 인것 / select는 리스트로 가져옴
    row=2 #엑셀디자인을 위해 행수세팅
    # 구분번호, 타이틀, 댓글수, 링크
    for index_numb, v in enumerate(all_Data_area[:5]):
        title = v.select_one('span.subject_fixed')
        comment = v.select_one('span.rSymph05')
        link = v.select_one('a.list_subject')
        if title != None:
            edit_Title = title.get_text().strip()
            edit_Comment = '[' + comment.get_text().strip() + ']'
            edit_Link = link['href']  #link href 속성값
            edit_Link_second = edit_Link.replace('news/','') #edit_link에서 news/를 공부으로 대체하는 전처리
            edit_url = url.replace('.html','/') #기존 url 크롤링 페이지에서 .html을 / 로 대체하는 전처리
            #게시글 상세보기 → 해당 상세보기페이지
            detail_Content = edit_url + edit_Link_second
            #데이터 엑셀에 적재
            core_data_1 = [index_numb, edit_Title, edit_Comment]
            excel_sheet.append(core_data_1)
            excel_sheet.cell(row = row, column = 2).hyperlink = detail_Content  #2번째 컬럼에 하이퍼링크 적용
            excel_sheet.cell(row = row, column = 2).font = hyperlink_font  #2번째 컬럼에 색상 적용
            #데이터 엑셀에 적재 : 디자인 적용
            for cell in excel_sheet[row]:
                cell.alignment = wrap_alignment #자동 줄바꿈
                if cell.column != 2:
                    cell.font = bold_font #bold 효과
            row += 1 #행 추가시 디자인 효과 적용

            #상세보기 페이지에 데이터 요청세팅
            my_Req_Second = requests.get(detail_Content)
            my_Soup_Second = BeautifulSoup(my_Req_Second.content,'html.parser')
            #select 문으로 div태그 중 comment_view 네임인 데이터들을 리스트로 선택
            comment_All = my_Soup_Second.select('div.comment_view')
            for i in comment_All:
                detial_Comment = i.get_text().strip().replace('\n',' ').replace('\t',' ')
                #데이터 엑셀에 적재
                core_data_2 = ['','',detial_Comment]
                excel_sheet.append(core_data_2)
                #데이터 엑셀에 적재 : 디자인 적용
                for cell in excel_sheet[row]:
                    cell.alignment = wrap_alignment #자동 줄바꿈
                row += 1 #행 추가시 디자인 효과 적용

    #엑셀 저장 및 종료
    excel_file.save('C:/python/api_crawling/크롤링_토이프로젝트.xlsx')
    excel_file.close()

    SAVE_EXCEL()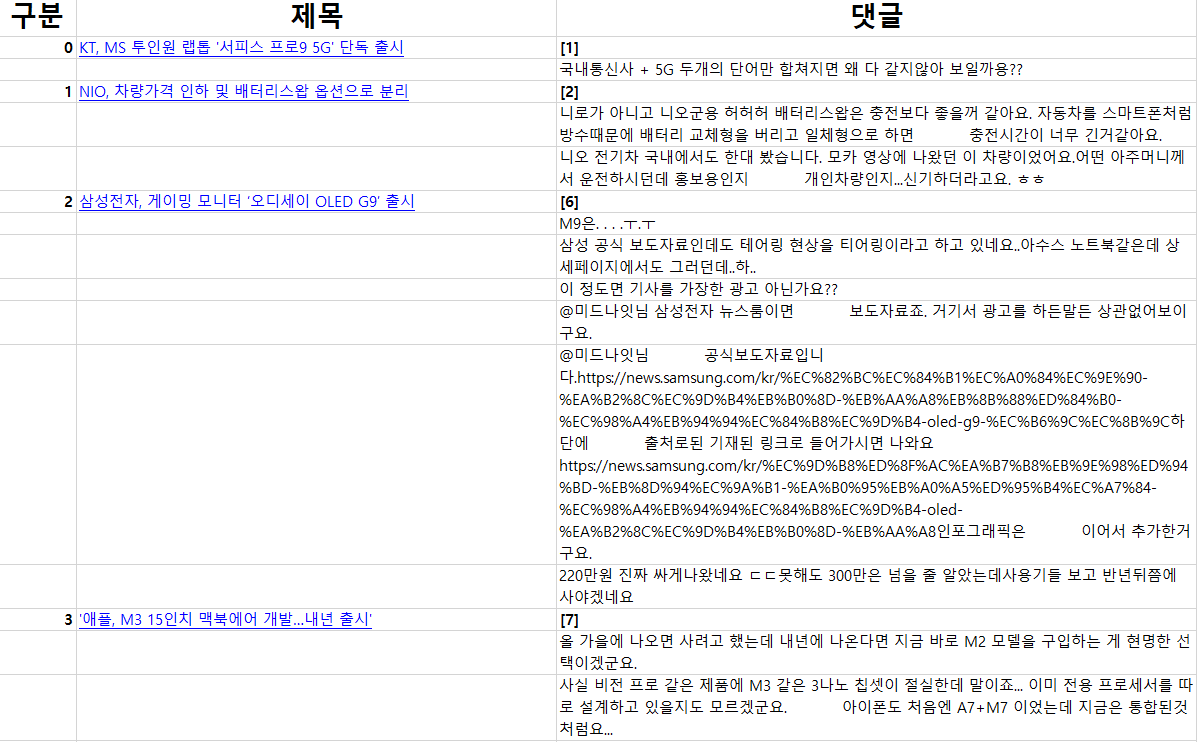
'Portfolio & Toy-Project' 카테고리의 다른 글
| 프로젝트 : 부산항만공사 서비스 제안관련 데이터분석-1 (0) | 2024.03.11 |
|---|---|
| 판다스 : .melt() 함수1 (0) | 2024.02.07 |
| 청소년 우울증(18년도, 22년도) : 연속 시각화(파이형그래프) 차트 생성 및 배치 (1) | 2024.02.07 |
| 타이타닉 데이터 전처리 및 시각화 (1) | 2024.02.06 |
| 파이썬(셀레니움)자동화_(구글 스프레드시트/카카오톡API&엑셀저장) (1) | 2024.01.25 |


